For tech-savvy professionals looking to create postcard designs outside of our app
Artwork Design Checklist for Printing
Ensure the postcard meets the required dimensions. Your artwork should include 'padding' that will be used as a bleed edge (1/8 inch on the edges) to prevent cutting errors.
For PDF documents, pre-processing will attempt to center on 'visible' elements. Add a white rectangle in the background to prevent content resizing.
Ensure padding around the mailing area on the reverse size. Continue the background behind the mailing area, or leave padding if the image should stop before the mailing area.
Do not include trim marks and guidelines in your artwork.
Use images with a resolution of at least 300 DPI to ensure they print clearly and sharply.
Embed all fonts or convert them to outlines to avoid font issues during printing.
Save the design in a print-ready file format such as PDF, with all layers flattened. Ensure each page is less than 10MB in size.
Keep all important elements (text, logos) within the safe zone (typically 1/8 inch inside the trim line) to avoid them being cut off.
Double-check the design for any errors, including typos, alignment issues, and overall quality.
Brand, Messaging, Offer & Visual Element
Ensure the headline grabs attention and communicates the main message effectively.
Keep the text brief, clear, and directly related to the offer or message.
Include a clear and compelling CTA, telling the recipient exactly what you want them to do next.
Use high-quality images and graphics that are relevant and engaging.
Ensure the postcard reflects your brand’s identity, including logos, colors, and fonts.
Include all necessary contact details, such as phone number, email, and website.
Clearly state the details of any promotions, discounts, or special offers.
Consider adding reviews from customers & neighbors that have used your products/services.
Use fonts that are easy to read and ensure there is sufficient contrast between text and background.
Check for any spelling, grammar, or punctuation errors and ensure overall content quality.
The bleed edge should always be included to ensure that artwork gets printed to the edge. This is because artwork gets printed with larger dimensions and is subsequently trimmed down.
Backgrounds and graphics should be extended into the bleed area. Not having them extend into the bleed area could result in a white or unprinted border around the edge of the postcard. For 4x6 postcards, you'll notice that the file that you are uploading is actually 4.25" x 6.25" instead of 4" x 6". This extra space is what we call the bleed edge.
When ordering the postcards online, our digital proof preview will always 'trim' the bleed edge so that you will see exactly what the postcards will look like when they are printed.
Select one of the common web-based design editors to see a quick tip on how to prepare and export the artwork
CREATE A DOCUMENT
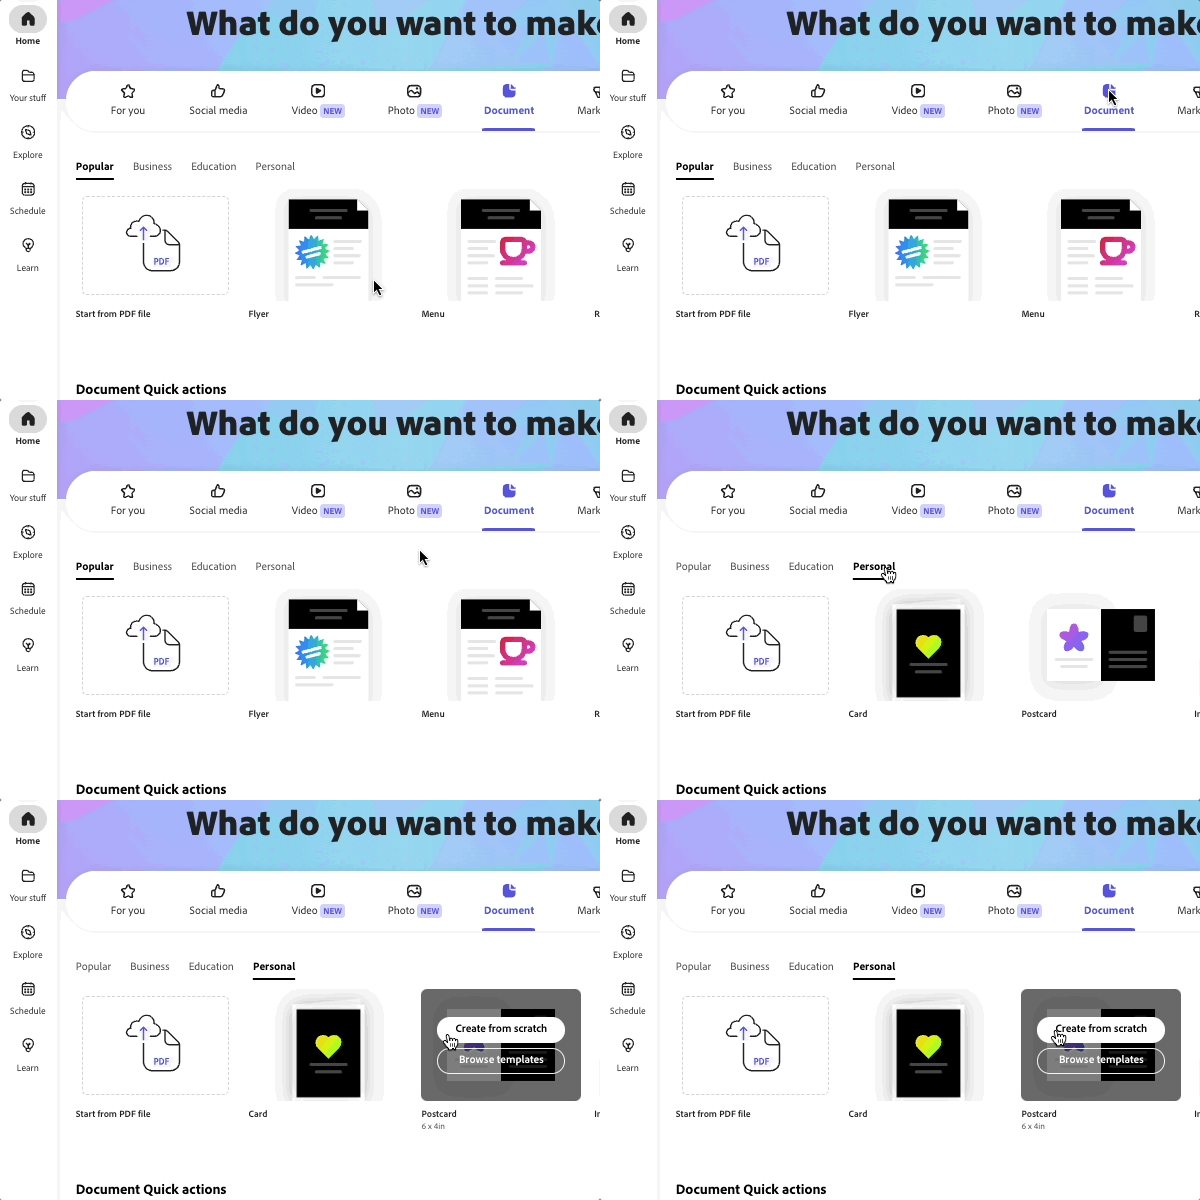
From the Dashboard, select Personal category and select Postcard. Or create a custom document that is 6x4, 6x9 or 6x11 inches.
EXPORT AS PDF
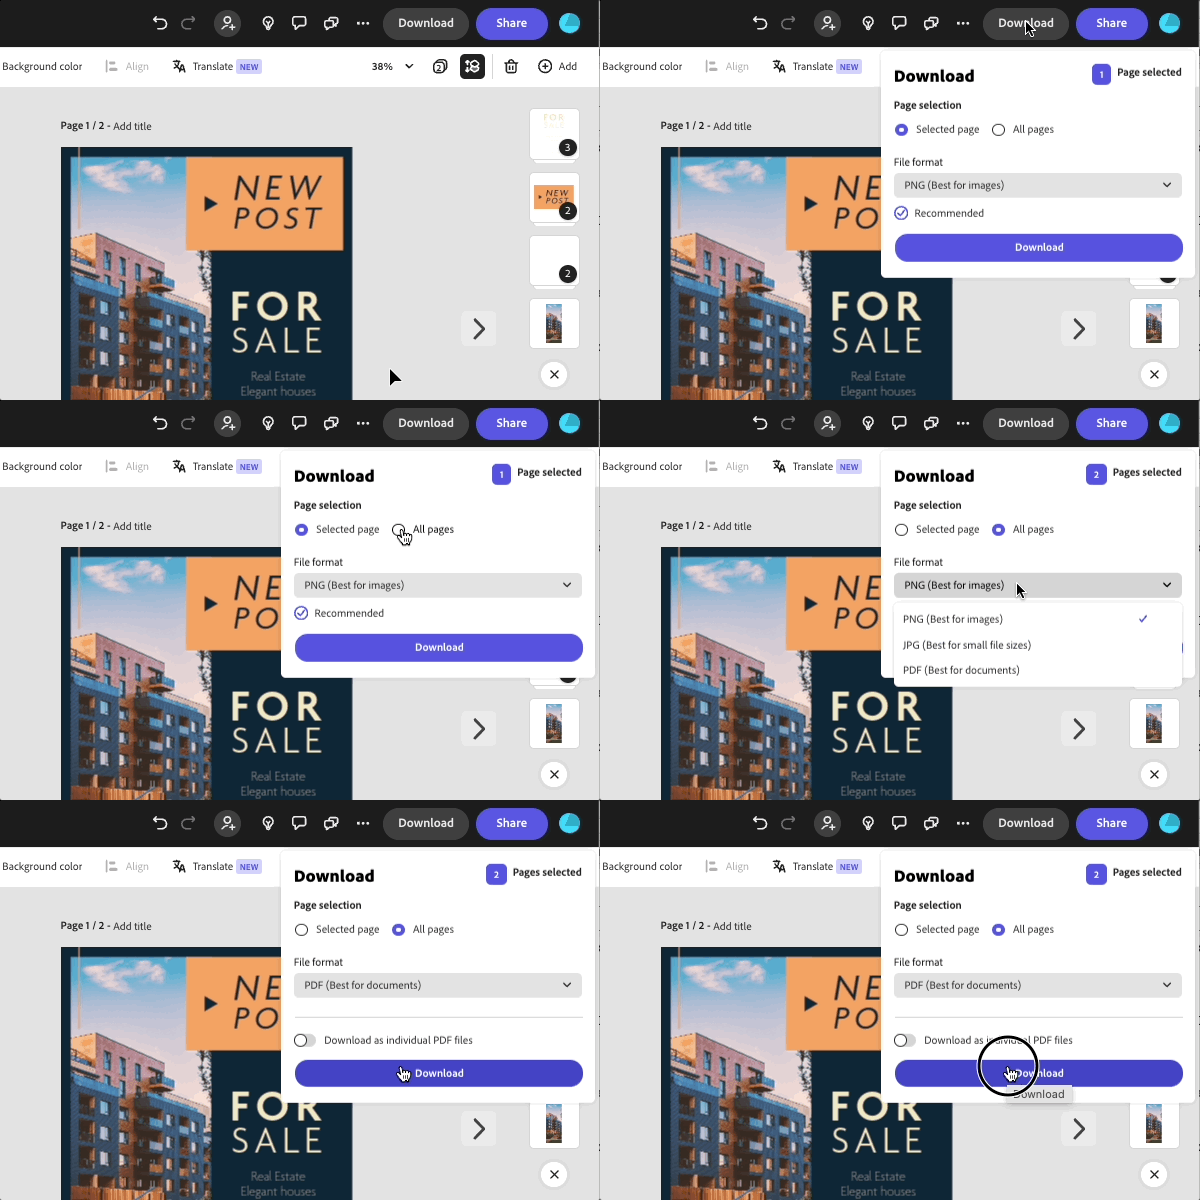
When you are done editing a document with two pages, click on Download. Select "All Pages" and pick PDF as the File Format. Download and save the file on your local device. Return to this page and upload the file into the Front Image placeholder.
CREATE A DOCUMENT
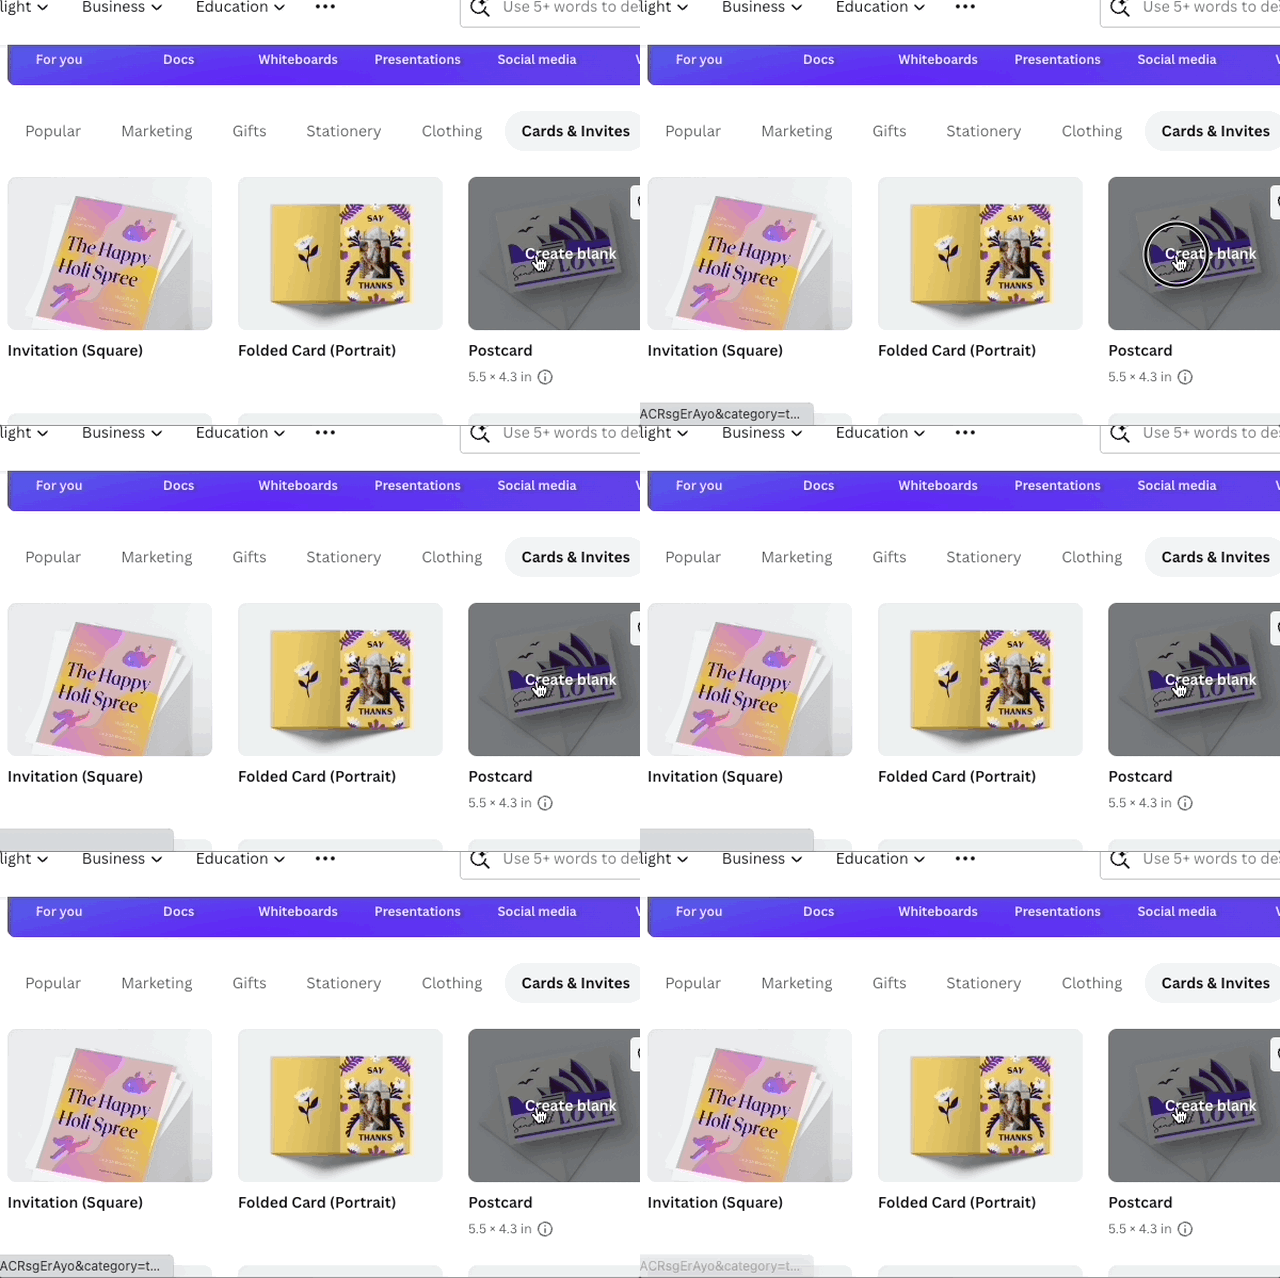
Select Cards & Invites category. Click on "Postcard - 5.5 x 4.3 inches" or create a custom document that is 6x4, 6x9 or 6x11 inches.
EXPORT AS PDF
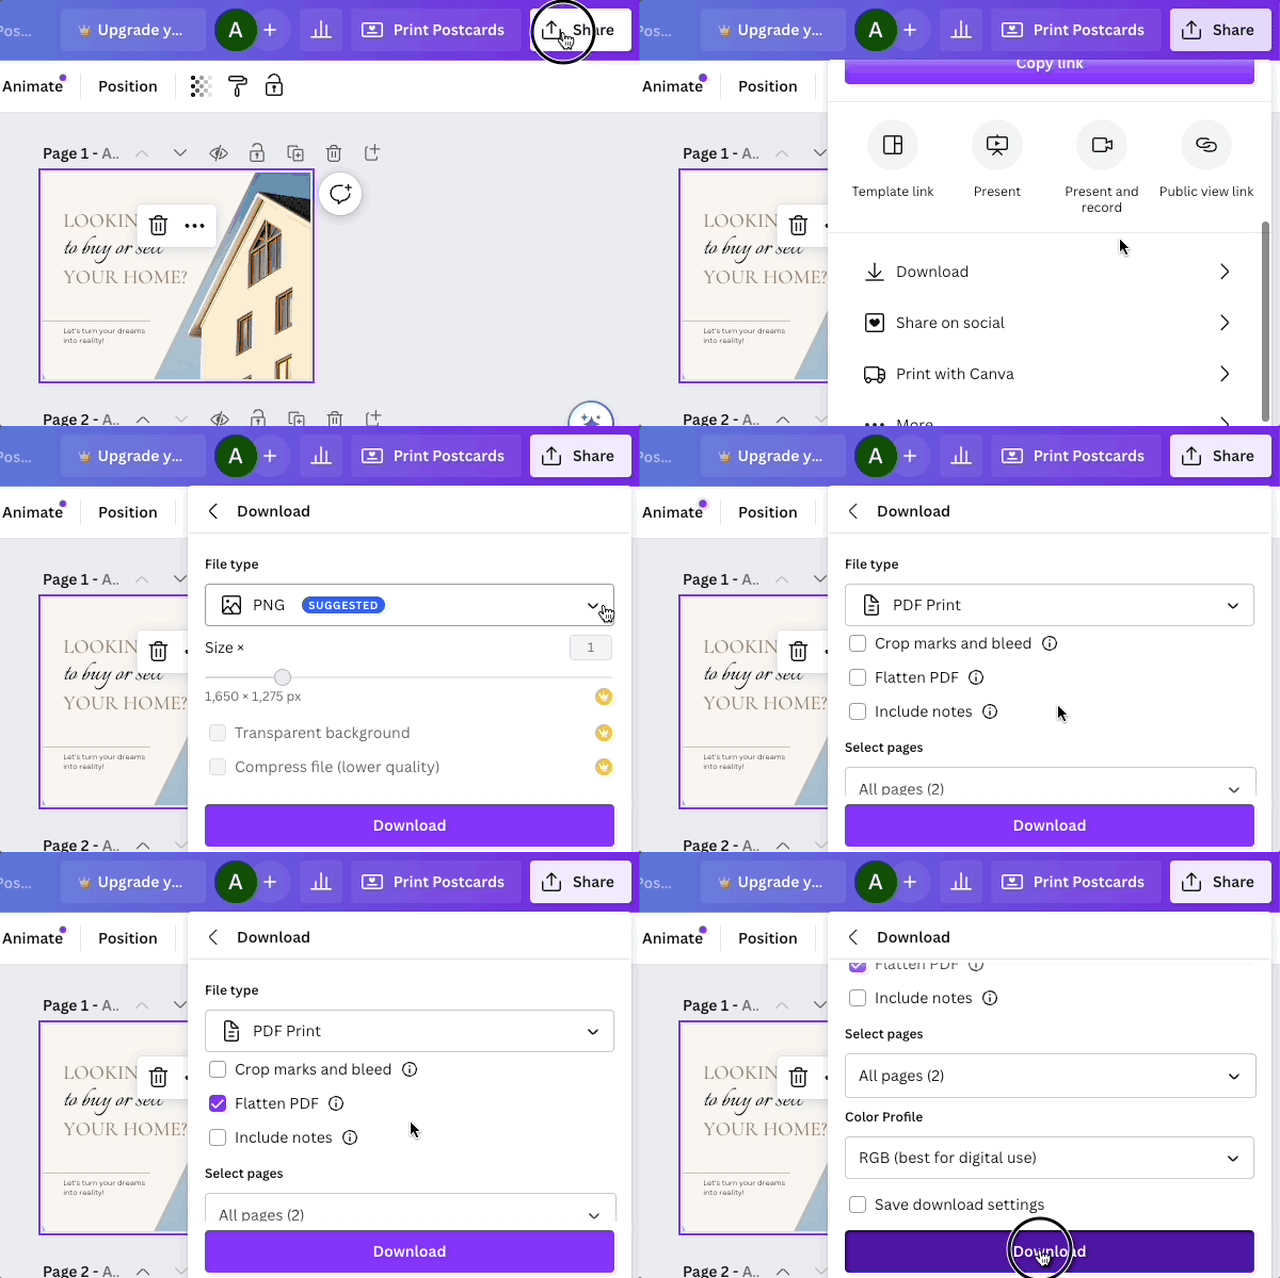
When you are done editing a document with two pages, click on Share. Scroll down and pick the Download menu. Select PDF Print as the file type. Click on "Flatten PDF" and download the file. Return to this page and upload the file into the Front Image placeholder.
SET SLIDE SIZE
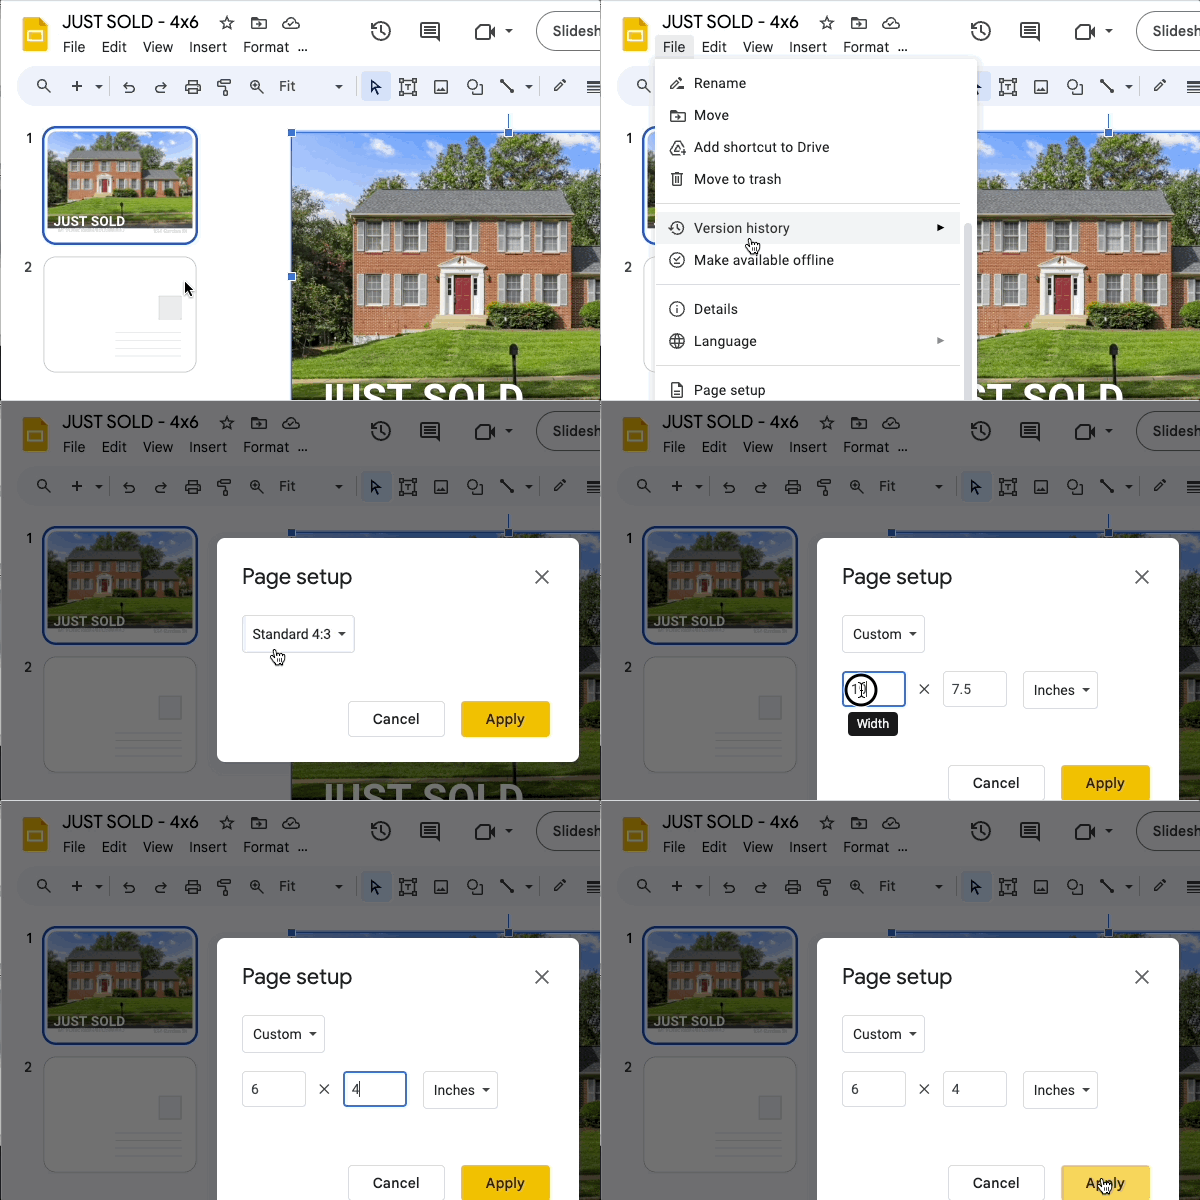
After creating a new slide deck, go to "File/Page Setup". Select "Custom" from the dropdown menu and update the size to 6x4, 6x9 or 6x11 inches.
EXPORT AS PDF
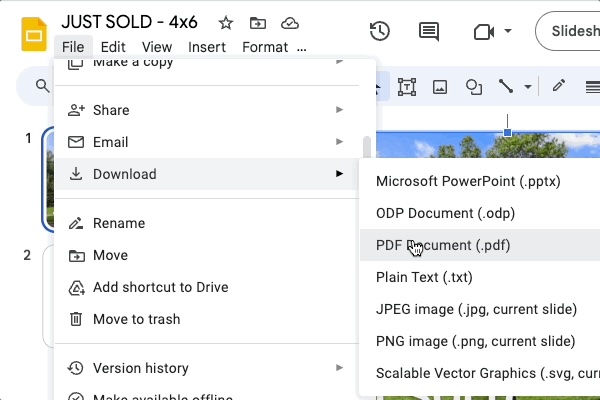
When you are done editing a document with two slides, go to File/Download. Select PDF Document and save the file on your local device. Return to this page and upload the file into the Front Image placeholder. Reverse image will auto-populate with the content from the second page.
SET SLIDE SIZE
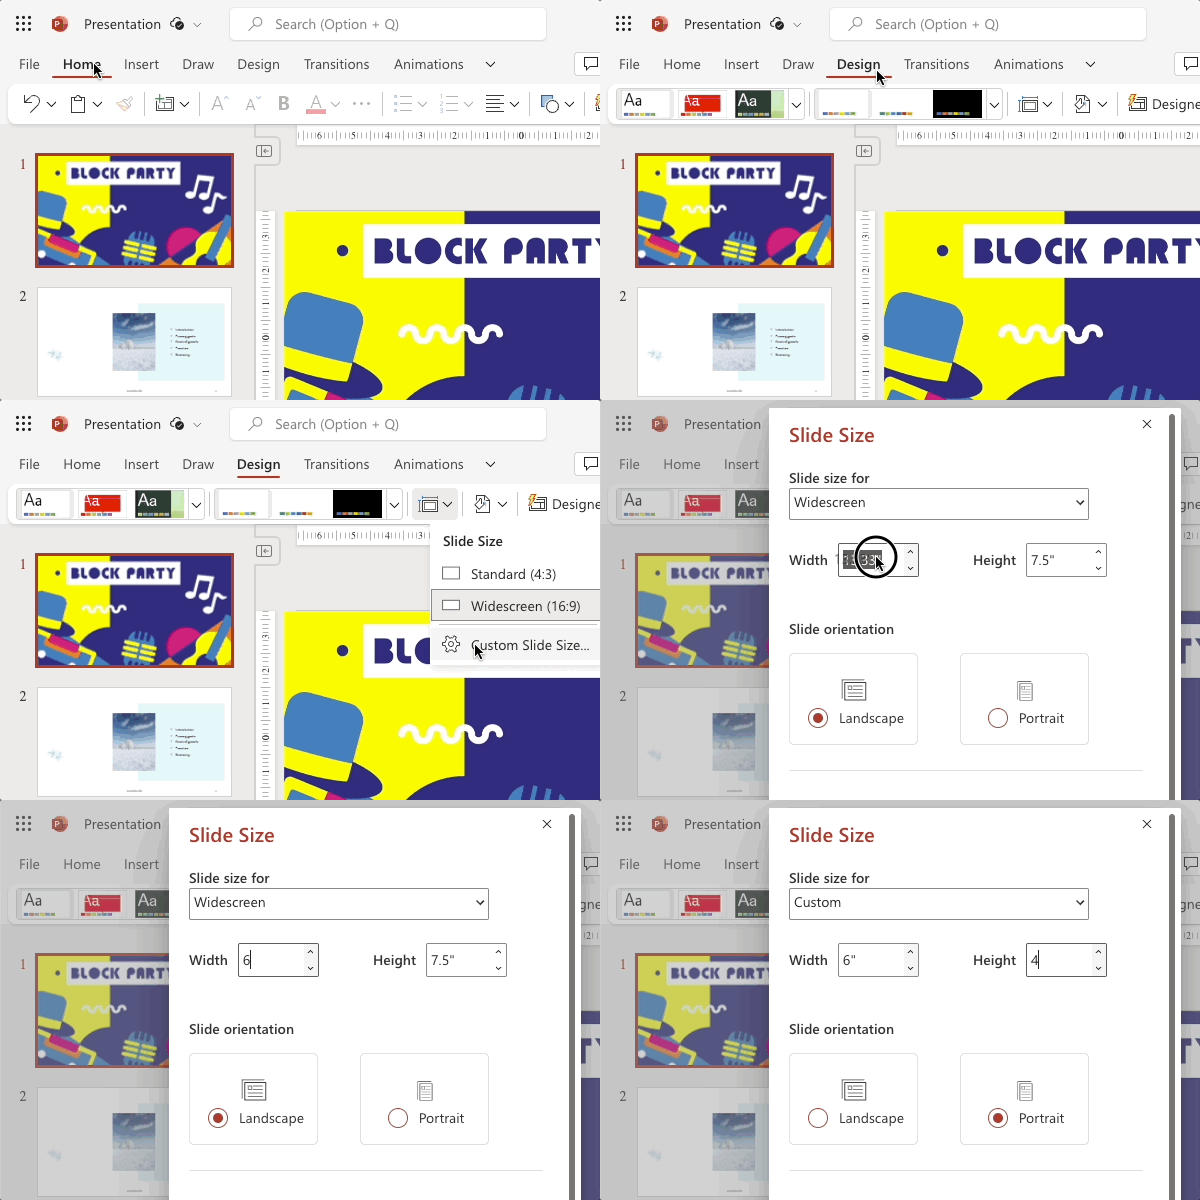
After creating a new slide deck, select "Design" in the top menu. Click on "Slide Size" Select "Custom" from the dropdown menu and update the size to 6x4, 6x9 or 6x11 inches.
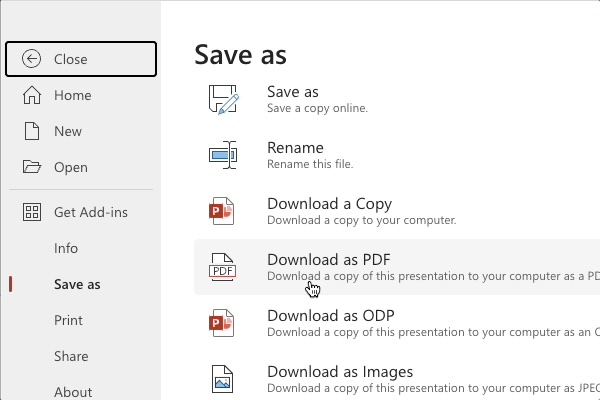
SAVE AS PDF
When you are done editing a document with two slides, go to File/Save as. Select Download as PDF and save the file on your local device. Return to this page and upload the file into the Front Image placeholder. Reverse image will auto-populate with the content from the second page.
CREATE A DOCUMENT
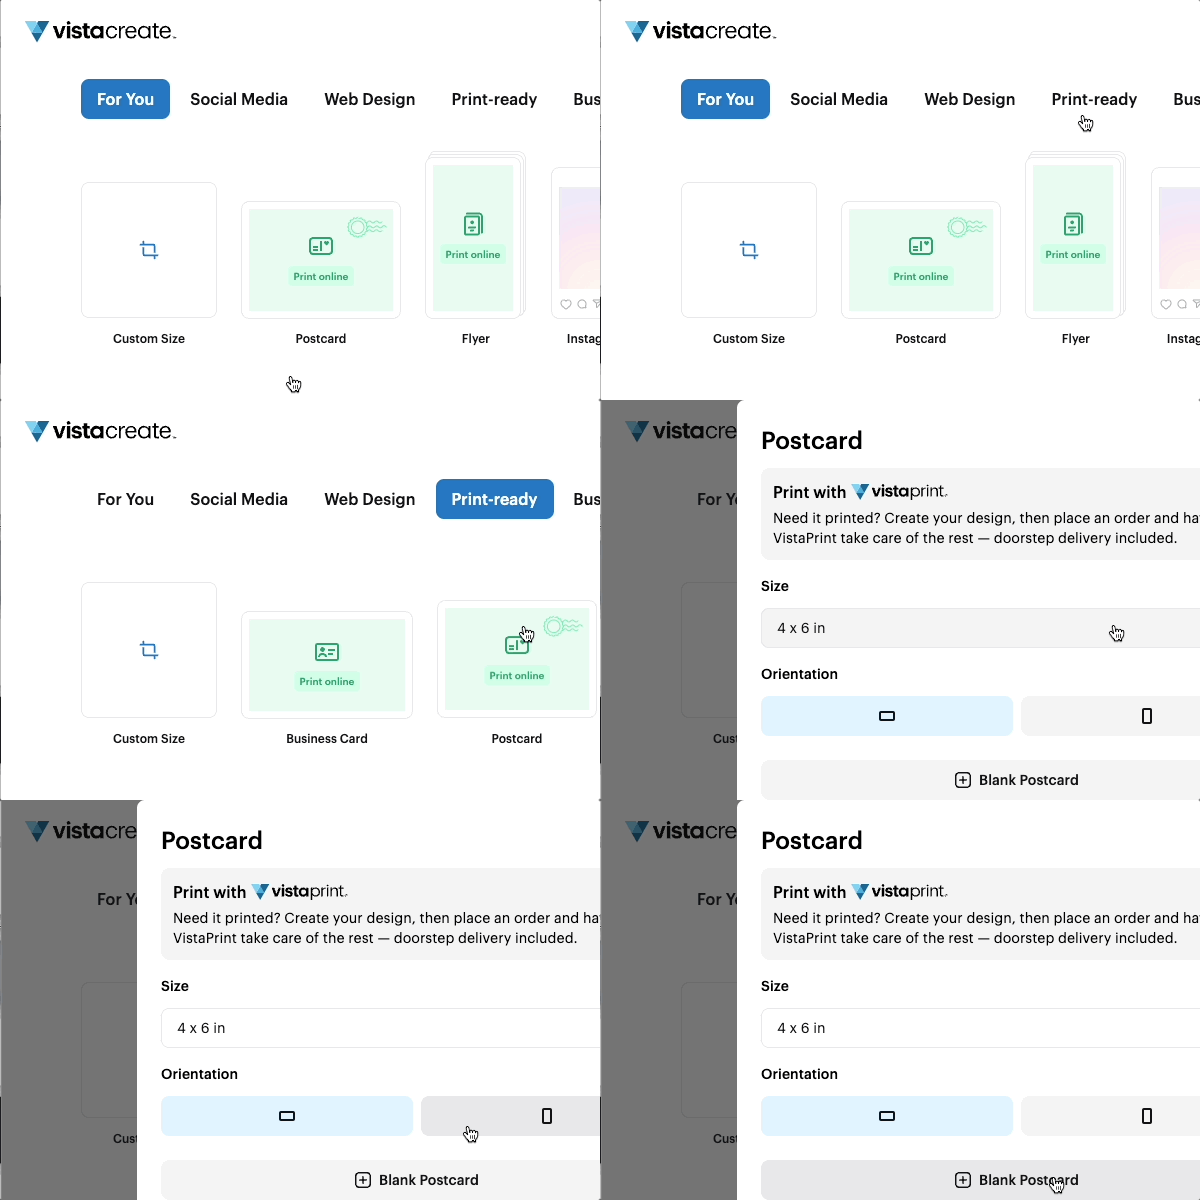
On Vista Create home page, select Print-ready category. Click on Postcard or click on Custom Size and specify width and height (6x4, 6x9 or 6x11). Be sure to select "inches" in the dropdown menu.
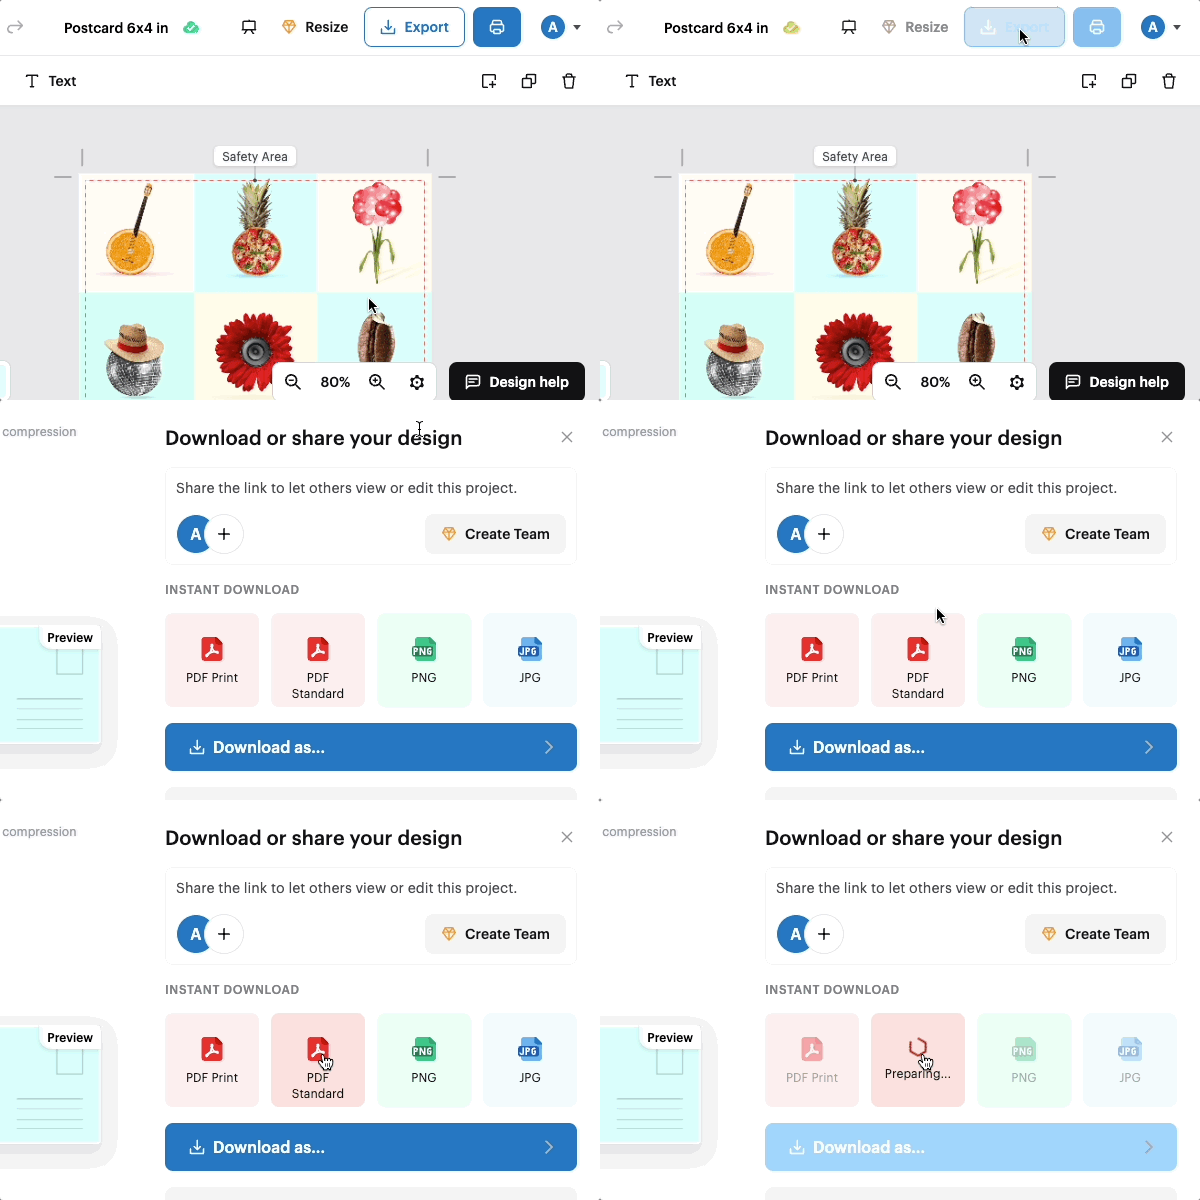
SAVE AS PDF
When you are done editing a document with two pages, click on Export. Select "PDF Standard" and save the file on your local device. Return to this page and upload the file into the Front Image placeholder. Reverse image will auto-populate with the content from the second page.
Here are other tools and services you might find useful
Use our intuitive map to select your target neighborhood and see the approximate mailing area.
Select from a variety of templates. Specifically designed for simplicity and effectiveness.
If you already have full images to upload, skip the app, and use our Order Express Lane.
Don't know where to begin? Use our Design Services and have your mailing ready in days.